Monday, July 16, 2012

Week 4 - Monday - Wrap up of hydro-electricity

I wrapped up the classroom instruction part of this project today with model building and computer mapping.

In the classroom, the students (working in teams of two) created a water cycle in a bottle.  First, each empty plastic bottle was filled half way with hot water.  The bottles were inverted and placed into plastic cups. 

An ice cube was placed on the flat end of each bottle.  The cold coming from the ice cube draws the warm water up.  Perception occurs as the water droplets get too heavy to stick to the inverted bottom of the bottle.

The students also constructed their own version of the Pelton water wheel. 

Using Styrofoam paper plates, they first punched matching holes in the their two plates (first image to the left).

They then stapled cups around the inside of one plate (second image to the left).

Their second plate was then stapled to the other side so that the cups were sandwiched in-between.

A completed water wheel is shown here (image to the right).


We gave the water wheels a test run using a lengthen coat hanger (as a string) run through the middle.  A water hose acted as our spray nozzle.


The students completed the day with a mapping exercise using ArcGIS Explorer Online.  They answered several questions about the San Gorgonio wind farm, did some measuring between the wind farm and Los Angeles, compared this wind farm to another, and they listed the geographic features necessary for a find farm (as well as a solar farm and a hydro-electric dam).

.


Source:
Water cycle demonstration:

http://scienceprojectideasforkids.com/2009/water-cycle/

Sunday, July 15, 2012

Complete Lesson Plan and Supply List

Two of my deliverables for this capstone project include a complete lesson plan and a supply list for the hands-on projects that have been completed. 

I have complied both into one document: Energy Literacy - Lesson Plan and Supply List.

Friday, July 13, 2012

Week 4 - Curriculum

The end is near - this is the last week of instruction.  We finish up this week with electricity generation using hydro technology. This involves two different model building activities, the last of our worksheets, and some computer mapping. 

As a closing activity, the students will design posters the represent their energy literacy knowledge.  Each student will have their own poster board to design/construct.  They will first design their posters using the storyboard sheet (linked below) and then type their text and find/print their images.  These posters will serve as an assessment element for my project (aside from the survey data that is being collected). The students will have an opportunity to present their posters at the closing ceremony on Friday.


Day 10: Hydro Electric Model Building and Computer Mapping
July 16, 2012

Assist the students (working in teams of two) in completing a hands-on experiment so that they better understand the elements of the water cycle: http://scienceprojectideasforkids.com/2009/water-cycle/

Assist the students in completing the hydro energy worksheets:
Older students' worksheet
Younger students' worksheet

Assist students (working in teams of two) with assembling water wheels:


Computer mapping—site location for wind farm (with a tie into solar and wind energy)


They will work in teams to construct their water cycle experiments.  Students will participate in a class discussion regarding the water cycle and the important role it plays in generating power using a hydro facility.

They will complete their individual worksheets and participate in a class discussion.


They will work in teams to construct and test their water wheels.


Students will use ArcGIS Explorer Online to learn more about the processing of siting a wind farm.

Day 11: Energy wrap up
July 17, 2012

Assist the students with creating their energy literacy posters using the poster writing prompt worksheet and the poster storyboard.

Their posters need to include:
1. The definition of energy,
2. Information regarding renewable energy sources,
3. A paragraph about how you view the environment,
4. A paragraph regarding the importance of knowing about energy, and
5. A map of the energy-related sites that you visited (Southern California Edison, Wind Farm, JPL, and the Seven Oaks Dam.


Post assessment:
20 survey questions


Each student will create a poster that demonstrates their knowledge of the topic of energy literacy.


Students will complete post-assessment survey.
Day 12: July 18
20 survey questions
Students will complete post-assessment survey.
Day 13: July 19
20 survey questions
Students will complete post-assessment survey.
Day 14: July 20
Energy Literacy Posters - Show and tell
Students will demonstrate their knowledge of energy literacy through a display of the posters they have created.

Week 3 - Friday - Seven Oaks Dam

It was a great day to be at the top of the Seven Oaks Dam.  Shown below is a picture of the staff.  The women in the middle (in the white pants) is Dr. Carol Ann Franklin.  She directs the Success Academy grant; she is also my on-ground capstone advisor.


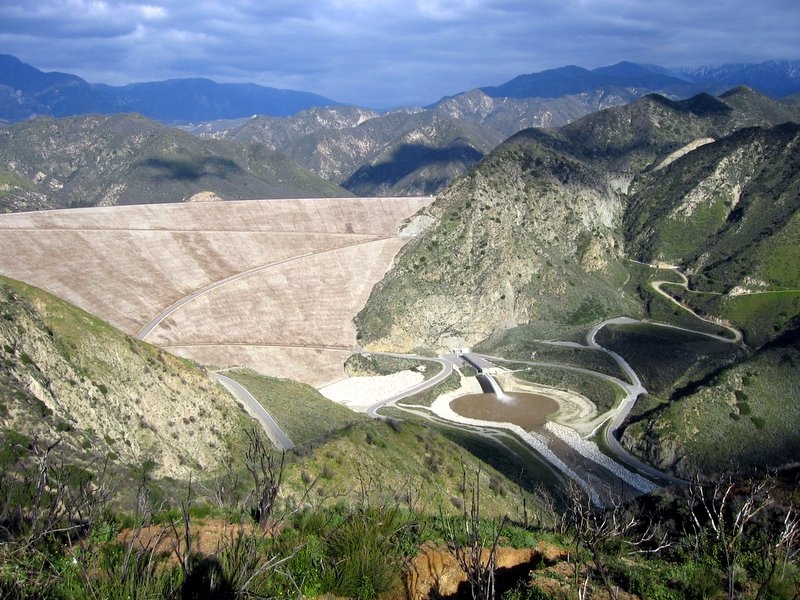
The height of the Seven Oaks Dam is roughly 500 ft.  This is a flood control dam, not a hydro-electric dam.  There is, though, a hydro-electric facility on-site that has been operating for the past 100 years (it is just not part of the dam construction).

Here is a picture of the Summer Success Academy students the top of the dam looking toward the city of Redlands. 

The other image you see (below - left) is looking back up the Santa Ana Canyon.  There isn't much water behind the dam currently.  It is mid-July and this past winter did not bring much rain or snow. 


The important thing to note here is that this is not a "recreational" site, nor is the water held back for future needs (what comes in, goes out).   The purpose of the Seven Oaks Dam is primarily flood control for Orange County (located to the south of here).  There is a discussion taking place whereby the regional water companies want this site to function as a storage facility so that water districts down stream can make use of any water held here during the dryer seasons.

For comparison sake, the image shown to the right is early spring when the reservoir behind the dam has the highest amount of water.

Electricity is generated on this site (just not through the release of water from the dam).  Water travels down a penstock to a power generation plant that has a pelton wheel.  Due to the lack of water currently, the power plant is unable to generate electricity.  When the site is generating power, roughlty 700-900 homes in the area are served.

Here is a look inside the power station.  The "tube" coming down at an angle (just behind the blue piece of equipment) is the pinstock   Water comes down the penstock and shots into the pelton wheel (at a high rate of pressure).  This spins the turbine and electricity is generated.

This video below provides a demonstration of how a pelton wheel fucntions:


Wednesday, July 11, 2012

Week 3 - Wednesday - Model building (and other activities)

Today started with a field trip to the University of Redlands co-generation plan.  Rick Quinbar did a great job in guiding the students through the center.  It was an opportune time to be there as the plant was not generating electricity (a valve had gone out).  The students learned that when the co-generation plant is down, the University of Redlands is forced to buy electricity from Southern California Edison.  Unfortunately, not being a "regular" customer, Southern California Edison has the ability to charge the university 3x the typical cost of electricity. 

When the University of Redlands does generate its own electricity, the by-product is hot water.  This water is used to heat buildings (especially our Science facility where lab animals need to be kept at a certain temperature).  The hot water is also used to heat the campus pool to a standard of 80 degrees (a requirement for the sports league that we operate in).  We also learned that the University of Redlands has purchased three years worth of natural gas (at a lower rate now with speculation that the price will go up in the future). 

Toysmith Windmill GeneratorHeading back to the classroom, the students wrote about their field trip to JPL (not specifically part of the energy literacy campaign) and the wind turbine tour.  One student wrote that he learned that "one wind turbine can generate more power than a a decent size solar array).  Another student wrote that he learned that a worker would need to "go in a door and climb a big ladder to the top."  Another wrote that "wind mills power lots of homes."  From the overall comments, the tour was a success.


The students, working in teams of two, constructed wind turbines from kits (shown here).  These was another great model building experience.  The students watched a brief movie and where then handed the kits and instructions.  It was great to see some kids working together to build the turbine (while others where happy to watch their teammate do the work).


The students then experimented with running their turbines in front of floor fans.  The bulbs actually lit up!  They tested how far from the wind source they could move their turbine before the bulb would not light (due to lack of power to the fan).


I wrapped up the day with the introduction to hydropower.  Friday is our tour to Seven Oaks Dam.


Image sources:
http://www.amazon.com/ComputerGear-Windmill-Generator-Science-Kit/dp/B001TG121K/ref=sr_1_16?ie=UTF8&qid=1342098224&sr=8-16&keywords=wind+turbine+kit
http://upload.wikimedia.org/wikipedia/commons/9/93/Seven_Oaks_Dam.jpg

Tuesday, July 10, 2012

Week 3 - Tuesday - Tour of the Palm Springs Wind Farm

While the thermometer read 110 degrees F, the tour of the Palm Springs wind farms was a great success.  The tour company, The Best of the Best Tours, did a wonderful job with our group.  Our tour guide, Ken Huskey, was very knowledgeable about the wind energy field.  He engaged our students and was very willing to answer questions.  Ken is featured in the brief video shown below.


Shown here, to the right, is one of the largest wind turbines in this area.  A turbine this size is capable of generating enough electricity to meet the needs of 400 homes (per day - when in full operation).

In terms of size, the very large wind turbines have blades the length of football fields.  To further understand the size, one could overlay a jumbo jet over the blade span (tip to tip).  The nacelle (where the mechanics are housed) is the size of a bus.


Shown here, to the left, is a natural gas burning power plant that operates in this area.  The stacks that are shown are just part of the issue (emitting the green house gas CO2 into the environment). 

Another concern with natural gas burning power plants is that they take a fair amount of water resources to operate (for cooling purposes).  A wind turbine does not take other resources to operate (other than water for the concrete pad when it was orginally poured and for scheduled maintenance - such as oil for lubrication).

Monday, July 9, 2012

Week 3 - Monday

Today was a great day.  I started with 5 multiple answer questions just to see where the students were with the topic of energy literacy.  I had them shout out the answers.  It was such a relief when they answered correctly!

After an introduction to wind power, the younger students split off and went to a separate room with a few of the other instructors.  They were led through the younger student handout (available in the previous post).  The rest of us worked with the older kids on the math worksheet.  This went really well!  The students stuck with it and worked through all of the wind energy calculations.

The younger kids joined us and, working in pairs, all of the students built anemometers out of cardboard, paper cups, and a stick pin. 

Once built, they tested their designs in front of floor fans.  The top design got 240+ revolutions per minute.

We awarded prizes for the top 6 outcomes. 

Tomorrow, Tuesday, July 10, 2012, we head to Palm Springs for a professional wind tour.

We will be back together as a group on Wednesday, July 11, 2012 to build wind turbines that, when they spin,, light a light bulb.


Graphic source http://www.energyquest.ca.gov/projects/images/anemo-meter.gif
.